Folder and Printer Sharing การแชร์โฟลเดอร์/เครื่องพิมพ์
Folder and Printer Sharing การแชร์โฟลเดอร์/เครื่องพิมพ์
โดย occupatech@gmail.com
All
of us use Windows7 as the operating software, and our computers are
connected together within the workgroup of the LAN (local area
network). So we should gain the benefit of its sharing capability. Here
we go!
ตอนนี้พวกเราล้วนแล้วแต่ใช้ Windows7 เป็นซอฟต์แวร์ระบบปฏิบัติการ (ในห้องเรียน และที่บ้านด้วย) และเครื่องของพวกเราก็เชื่อมต่อกันเป็นเวิร์กกรุ๊ปในระบบแลน ดังนั้นเราก็น่าจะใช้ความสามารถในการแชร์ทรัพยากรระหว่างกันได้ ลองดูกัน
1. FOLDER SHARING
การแชร์โฟลเดอร์
Be sure we have to specify what folder that we want to share?
ต้องระบุโฟลเดอร์ที่ต้องการแชร์
Make a right clicking with the folder, the dialogue box appears. Select the "Sharing" tab and the "Advanced Sharing" button
คลิกขวาที่โฟลเดอร์ กรอบโต้ตอบจะปรากฏขึ้น เราก็เลือกแท็บ "Sharing" และปุ่ม
"Advanced Sharing"
Properties window of the folder appears and we should select to share it with others. Now we can see the maximum number of users to simultaneously enter to the folder is 20. Then we can click on the "Permission" button.
จะ ปรากฏหน้าต่างพรอพเพอร์ตีส์ (คุณสมบัติ) ของโฟลเดอร์นี้ขึ้นมา และเราก็ต้องเลือกว่าจะแชร์กัน และจะเห็นว่า เพื่อนๆ จะเชื่อมต่อเข้ามาใช้โฟลเดอร์ของเราพร้อมกันได้เต็มที่ 20 เครื่อง แค่นั้น ต่อมาก็เลือกคลิกปุ่ม "Permission"
After clicking on the permission button, the Permissions window shows up, you can add any user e.g. "student" and you can change the permission type of the user.
หลังจากคลิกปุ่ม permission จะมีหน้าต่างโผล่มาให้เราปรับเปลี่ยนตามความต้องการ
ตอนนี้พวกเราล้วนแล้วแต่ใช้ Windows7 เป็นซอฟต์แวร์ระบบปฏิบัติการ (ในห้องเรียน และที่บ้านด้วย) และเครื่องของพวกเราก็เชื่อมต่อกันเป็นเวิร์กกรุ๊ปในระบบแลน ดังนั้นเราก็น่าจะใช้ความสามารถในการแชร์ทรัพยากรระหว่างกันได้ ลองดูกัน
1. FOLDER SHARING
การแชร์โฟลเดอร์
Be sure we have to specify what folder that we want to share?
ต้องระบุโฟลเดอร์ที่ต้องการแชร์
 |
| "BOOKS" is the folder of us to be shared. โฟลเดอร์ "BOOKS" คือโฟลเดอร์ที่เราอยากแชร์ |
Make a right clicking with the folder, the dialogue box appears. Select the "Sharing" tab and the "Advanced Sharing" button
คลิกขวาที่โฟลเดอร์ กรอบโต้ตอบจะปรากฏขึ้น เราก็เลือกแท็บ "Sharing" และปุ่ม
"Advanced Sharing"
 |
| Now the folder has never been shared yet (Not Shared) ตอนนี้โฟลเดอร์นี้มีสถานภาพไม่ได้ถูกแชร์ไว้ |
Properties window of the folder appears and we should select to share it with others. Now we can see the maximum number of users to simultaneously enter to the folder is 20. Then we can click on the "Permission" button.
จะ ปรากฏหน้าต่างพรอพเพอร์ตีส์ (คุณสมบัติ) ของโฟลเดอร์นี้ขึ้นมา และเราก็ต้องเลือกว่าจะแชร์กัน และจะเห็นว่า เพื่อนๆ จะเชื่อมต่อเข้ามาใช้โฟลเดอร์ของเราพร้อมกันได้เต็มที่ 20 เครื่อง แค่นั้น ต่อมาก็เลือกคลิกปุ่ม "Permission"
 |
| Tick the check-box, and we can change the share name or ignore it. ติ๊กเลือกว่าจะแชร์ จะเปลี่ยน/หรือไม่เปลี่ยนชื่อที่จะแชร์ก็ได้ |
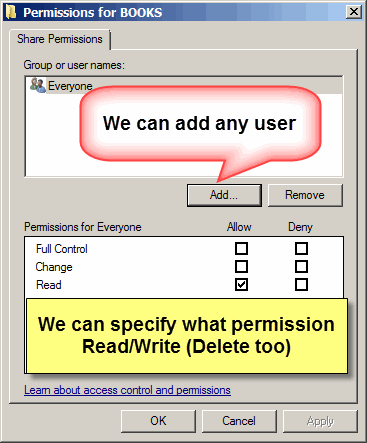
After clicking on the permission button, the Permissions window shows up, you can add any user e.g. "student" and you can change the permission type of the user.
หลังจากคลิกปุ่ม permission จะมีหน้าต่างโผล่มาให้เราปรับเปลี่ยนตามความต้องการ
 |
| We can add user/ specify his permission level. เราสามารถเพิ่มยูสเซอร์ / ระบุระดับการอนุญาตใช้งานโฟลเดอร์ของเราแก่เขา |
Finally click on the "Apply" button, the folder now has been shared.
เมื่อเราคลิกปุ่ม "Apply" โฟลเดอร์ของเราก็ได้รับการแบ่งปันให้ใช้ร่วมกันได้ในเครือข่ายแล้ว
Sample Special
ตัวอย่าง
This is from my computer (Its hostname is "ALPHA00".), when I click on the "Network" (at the left pane of Windows7 "Computer explorer" ) some computer hostnames appears. Yes, I want to randomly select any hostname. If the target of mine is "KACHATUCH", yes I would make a double-click on it.
นี่ เป็นคอมพิวเตอร์ของครูที่ห้องพักครู (โฮสต์เนมว่า ALPHA00) เมื่อครูคลิกเลือก Network (อยู่ตรงแถบซ้ายของหน้าต่าง Computer explorer ของ Windows7 ก็จะปรากฏโฮสต์เนมต่างๆ ในเครือข่าย แน่นอนว่า ครูก็คงต้องสุ่มเลือกเข้าไปใช้เครื่องใดสักเครื่อง ที่ครูเล็งไว้ก็คือเครื่องที่มีโฮสต์เนมว่า Kachatuch
The shared folders of the hostname will be appeared. Then we can do a random selection and we can find any other subfolders that we can select to use.
ตอน นี้ก็จะเห็นโฟลเดอร์ที่โฮสต์เนม Kachatuch เราก็คงต้องสุ่มเลือกโฟลเดอร์ แล้วเราก็จะเห็นโฟลเดอร์ย่อยๆ ที่เราสามารถจะเลือกเข้าไปใช้ได้
2. PRINTER SHARING
การแชร์พรินเตอร์
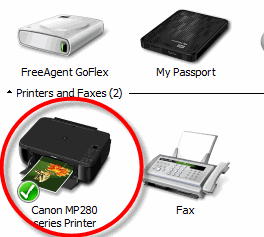
Click the "Start button" of Windows7 desktop, the pop-up menu appears, then select "Devices and Printers", the target printer of us will be appeared.
จากปุ่ม Start ของ Windows7 เราก็เลือก "Devices and Printers" ก็จะเจอพรินเตอร์ที่เราอยากจะแชร์กันใช้
Make a right click on the printer icon, the select menu will show up, then select "Printers properties" option. Then we can operate sharing easily.
คลิ กขวาที่รูปพรินเตอร์ จะมีป็อปอัพเมนูโผล่ขึ้นมา ให้เราเลือก "Printers properties" ต่อจากนี้ เราก็คงจะปฏิบัติการแชร์พรินเตอร์ได้ไม่ยากแล้ว...
Click on the "Sharing tab", and we can rename the sharing printer.
เลือกแท็บ Sharing และสามารถเปลี่ยนชื่อพรินเตอร์ที่กำลังจะแชร์ได้ด้วย


ไม่มีความคิดเห็น:
แสดงความคิดเห็น